Blogging with Jekyll, Azure Static Web Apps, and WSL 2.0
Explore how to create a Zero Trust–minded blog using Jekyll on Azure Static Web Apps, integrated with Microsoft Defender and managed through Intune policies—without requiring local admin rights.
As a security architect, security is always top of mind—even when creating a personal blog. With my focus on Microsoft Defender solutions, I wanted a blogging platform that wasn’t just flexible, but also secure by design. My goal was to create a blog that operates on a Zero Trust model—where security is embedded into every layer, from authentication to the deployment pipeline.
Why Choose a Secure Blogging Platform?
Security is a constant priority. For my personal blog at defender-sensei.com, I wanted to ensure that there was no risk of credential theft, no backend to exploit, and no dynamic content to worry about. Static sites are an excellent way to achieve this—there’s no database or login page, and everything runs on static files.
After some research, I chose Jekyll, a static site generator that integrates seamlessly with GitHub Pages or Azure Static Web Apps. Jekyll’s simplicity and lack of dynamic content meant I could focus on security rather than managing a complex infrastructure.
The Power of WSL 2.0: Zero Trust in Action
I manage my workstation through Intune, which allows me to configure and enforce policies like WSL 2.0. The decision to use WSL 2.0 was motivated by the fact that it works seamlessly with Microsoft Defender, which acts as my Endpoint Detection and Response (EDR) solution. This provides an extra layer of security because Defender has direct visibility into my WSL environment.
Moreover, with Intune’s ability to enforce Conditional Access and manage compliance policies, I can ensure that the environment remains secure and compliant without needing local admin rights.
Why Not GitHub Pages?
Though Jekyll can be hosted on GitHub Pages, I decided to use Azure Static Web Apps for a few reasons:
-
Better Security: Azure provides deep integration with Defender for Cloud, offering a range of security services like Code Repository Scans to detect vulnerabilities.
-
Private Repositories: Hosting the source code in a private GitHub repository ensures I have control over when a post goes live. I don’t want unfinished content visible to the public.
-
Visibility and Monitoring: Through Defender for Cloud, I get real-time security insights for my Azure-hosted website, giving me the peace of mind that it’s being actively monitored for any issues.
Overcoming Practical Challenges: WSL 2.0 Without Admin Rights
One of the challenges I faced was that my workstation is managed via Intune, which means I can’t have local admin rights. Normally, setting up Ruby and Bundler to run Jekyll locally would require admin rights. But I wanted to find a way to run and test my blog locally without compromising security or functionality.
Here’s what I learned during the process:
Set Up WSL 2.0 Without Local Admin Rights
Normally, installing WSL 2.0 requires local admin rights. However, I found a solution through Intune management. Here’s how I configured it:
Create an Intune Group for WSL 2.0 Management
- Create an Intune group called
GLO-Intune-WSL-Enabled. This group should include:- Users who need access to WSL 2.0
- The necessary licenses (EPM license, Defender for Endpoint)
- WSL 2.0 configuration settings
Install Defender for Endpoint
- Install Defender for Endpoint on WSL 2.0 using Intune:
- Download the Defender for Endpoint agent from the Defender Portal:
Go to: https://security.microsoft.com
Navigate to: Settings > Defender for Endpoint > Onboarding
- Download the Defender for Endpoint agent from the Defender Portal:
- Deploy Defender via Intune:
- Go to: Intune > Apps > New App > Windows MSI line-of-business app
- Upload the Defender for Endpoint
.msifile. - Ensure it’s installed in System Context.
Note: The agent will automatically update, providing continuous protection.
Endpoint Privilege Management (EPM):
To secure and control administrative privileges even in the WSL 2.0 environment, I use Endpoint Privilege Management (EPM) to prevent elevation of privileges. Here’s how to set it up:
- Assign EPM License:
- Purchase and assign the EPM license for Intune via the Admin Center.
- Export the Certificate for WSL Processes:
- Use the following PowerShell script to export the certificate of WSL processes:
1
2
3
4
5
6
7
8
9
10
11
$exePaths = @("c:\windows\system32\wsl.exe", "C:\Program Files\WSL\wsl.exe")
foreach ($exePath in $exePaths) {
    $cert = Get-AuthenticodeSignature -FilePath $exePath
    if ($cert.SignerCertificate) {
        $exportPath = "C:\Temp\WSL-Cert-" + (Split-Path $exePath -Leaf) + ".cer"
        $cert.SignerCertificate | Export-Certificate -FilePath $exportPath
        Write-Host "Certificate exported to $exportPath"
    } else {
        Write-Host "No certificate found for $exePath."
    }
}
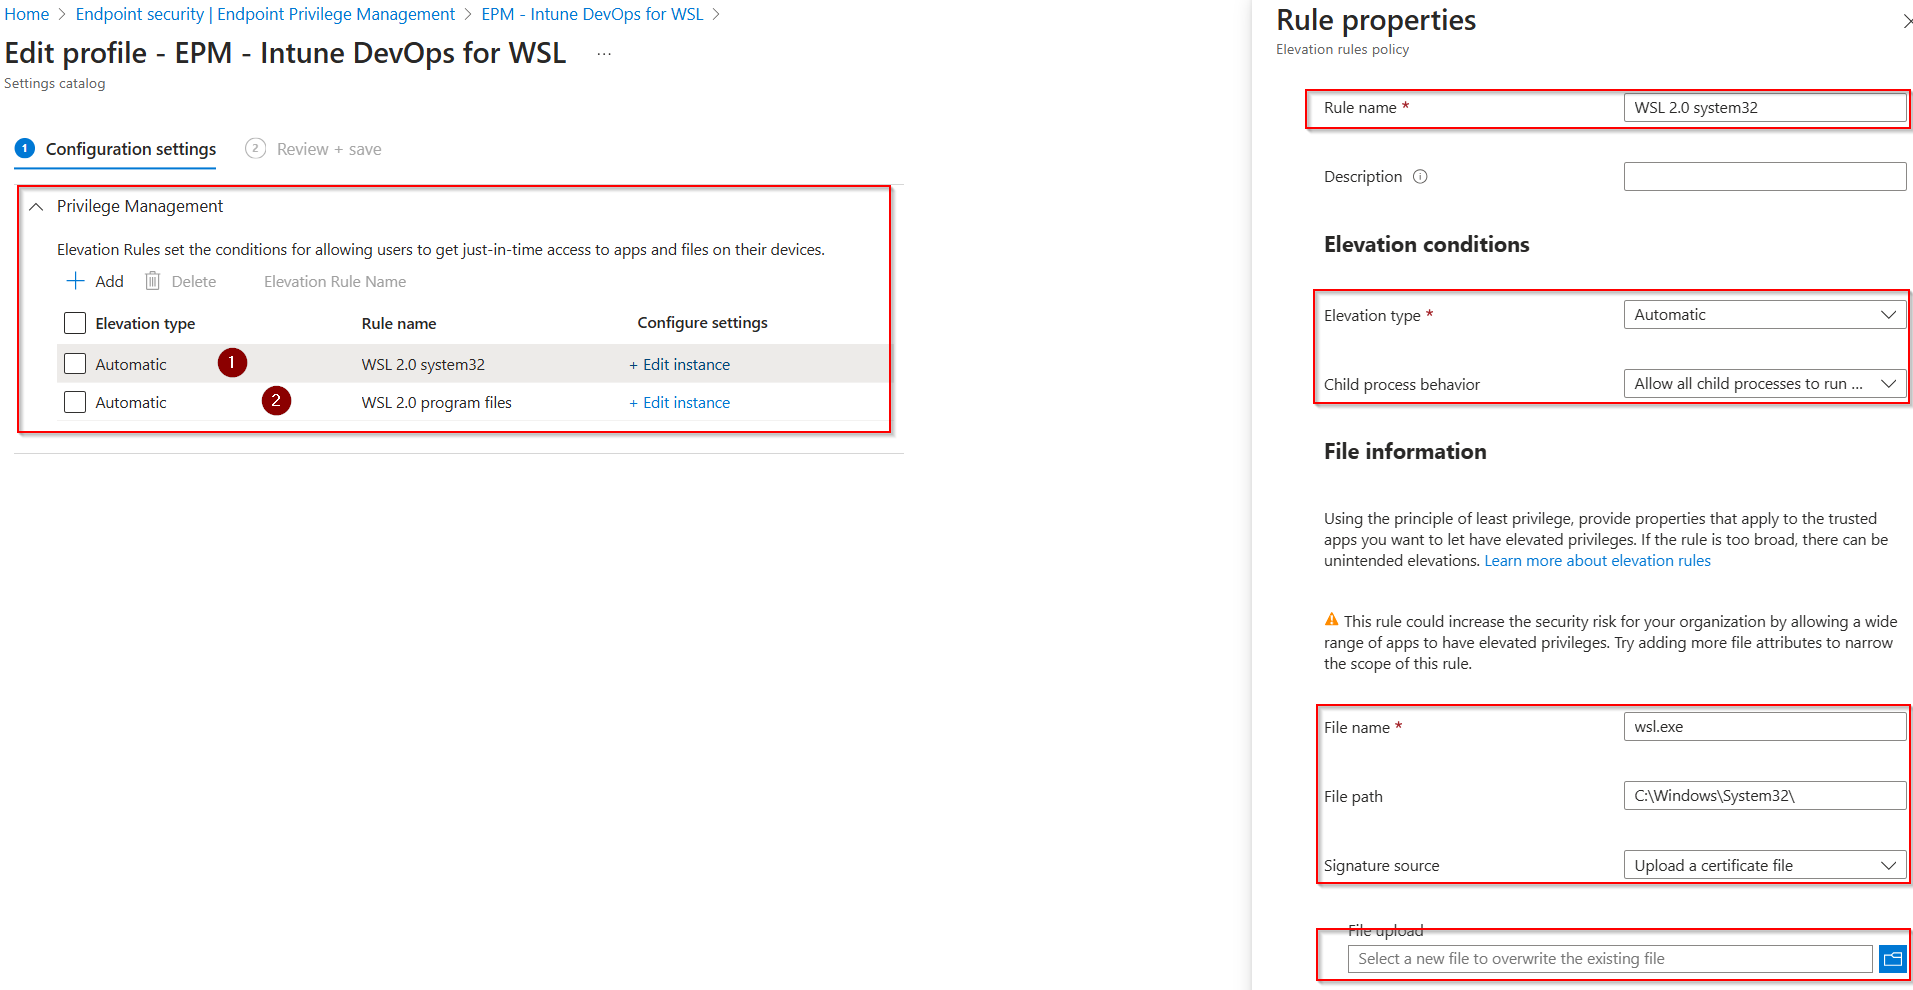
Create EPM Policies in Intune:
-
Go to: Intune > Endpoint Security > New (Elevation rules policy)
- Set the following:
- Evaluation type: Automatic
- Rule Name: WSL 2.0 System 32, WSL 2.0 Program Files
- Child Process Behavior: Allow all child processes to run elevation
-
Signature Source: Upload the exported certificate
- Assign the Policy:
- Assign the policy to the GLO-Intune-WSL-Enabled group.
Configure the WSL 2.0 Settings
To finalize the setup, use the Commodity Project for OpenIntune to apply standard security settings for WSL 2.0.
-
Import the policy:
Win - OIB - Device Security - D - Windows Subsystem for Linux - v3.2 - Enable nested virtualization to allow interaction with DevOps tools like VSCode:
-
Allow nested virtualization: Set to Enabled
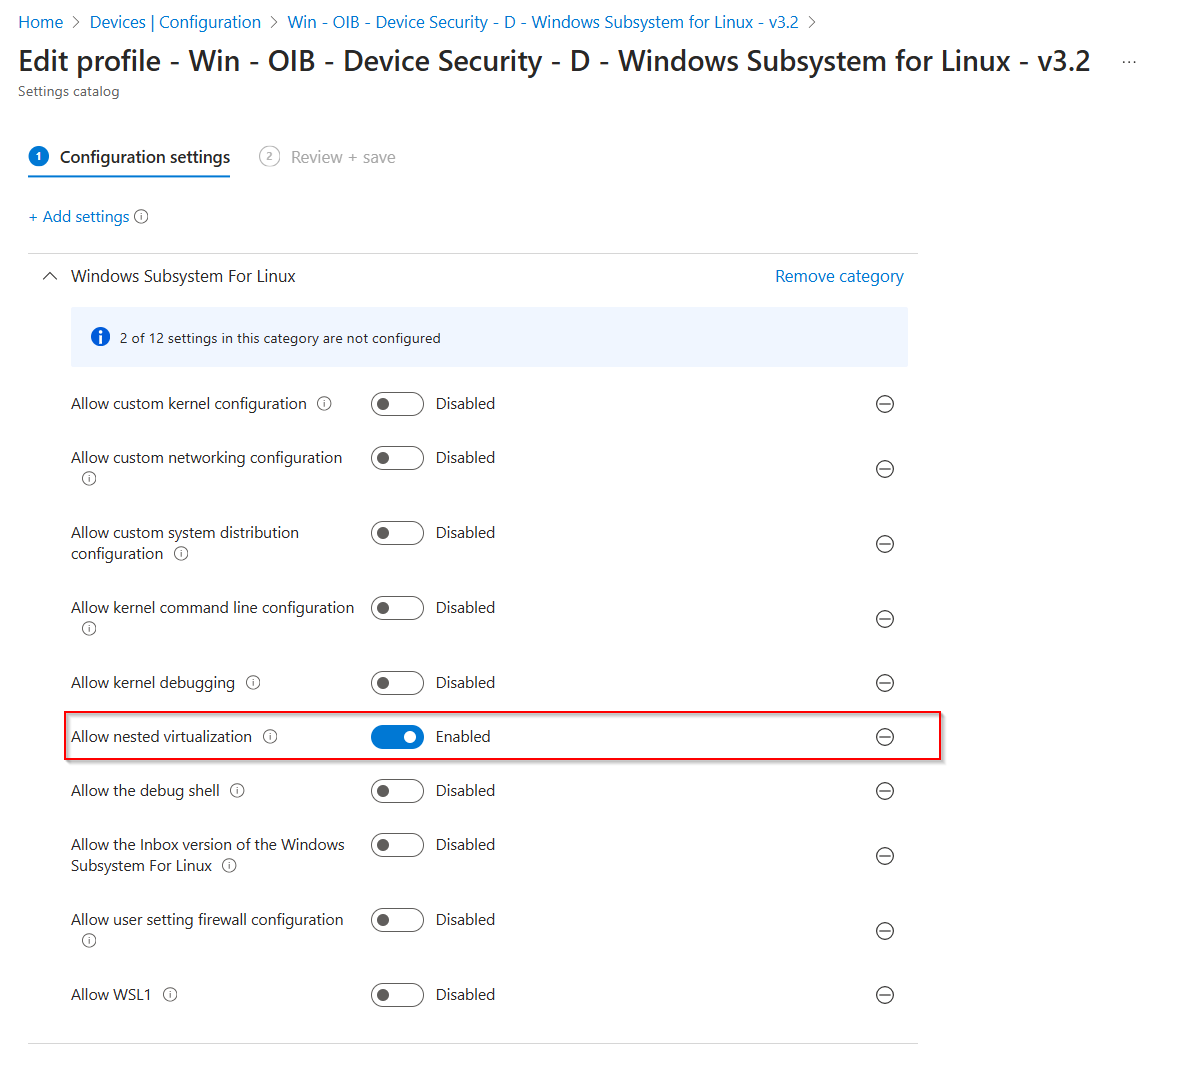
-
- Deploy the policy to the GLO-Intune-WSL-Enabled group.
Step 2: Use Visual Studio Code (VSCode) in WSL 2.0
After setting up WSL, I installed a Linux distribution (Ubuntu) via PowerShell with the command:
1
wsl --install -d ubuntu
Then, I installed VSCode extensions specifically designed for WSL (such as Remote - WSL). This allowed me to edit the blog locally in the Ubuntu environment without having to interact directly with the Windows OS.
Configure the GitHub Actions Pipeline for Azure Static Web Apps
I faced some challenges creating a workable pipeline because the Jekyll theme Chirpy wasn’t compatible with the built-in Ruby version on Ubuntu 22.04. I learned that I can track the latest Ruby releases in the ruby/setup-ruby repository on GitHub. By reviewing the changelog there, I found the correct Ruby installer version for my setup.
Because we’re deploying a Jekyll site to an Azure Static Web App, the first run of the GitHub Action may fail. Don’t worry—after the initial run, just do a git pull to update your local repository with any newly added workflow files. Then, modify the .github/workflows/azure-pages-<WORKFLOW_NAME>.yml file to include the missing setup steps before the - name: Build And Deploy line:
Here’s a sample of the updated GitHub Action to include the necessary setup:
1
2
3
4
5
6
7
8
9
10
- name: Set up Ruby
  uses: ruby/setup-ruby@v1.229.0 ## check the latest version at https://github.com/ruby/setup-ruby/releases
  with:
    ruby-version: 3.3.2 ## check the change log for the compartible ruby version.

- name: Install dependencies
  run: bundle install

- name: Jekyll build
  run: jekyll build
Why This Approach?
- Security: With Zero Trust at the core, I don’t need local admin rights, and Microsoft Defender protects both the workstation and the hosted blog.
- Compatibility: I can use DevOps tools like Git and VSCode within WSL, ensuring a smooth development experience.
- Visibility and Monitoring: The integration with Defender for Endpoint ensures that I have real-time visibility into any security incidents, while Defender for Cloud monitors the Azure-hosted website.
Conclusion
This journey has not only improved my understanding of security in the context of modern blogging but has also reinforced my belief in the importance of Zero Trust principles. By leveraging Jekyll, Azure Static Web Apps, and WSL 2.0, I’ve created a secure, efficient, and scalable platform for my blog—without compromising on security or ease of use.
For anyone looking to set up a secure, passwordless blog with Zero Trust principles, this approach is a powerful and flexible solution.